Speakers & Screen
Checklist
Section titled “Checklist”Speakers setup checklist
This is a condensed checklist if you already know what everything does. For more info on each, read on below
Speakers
Checks
Placement
Section titled “Placement”There’s 2 speakers, on the left and right. Ideally, they should be towards the middle of each quadrant. See below:

In practice, ours will look something like below. Note the screen position.

So here’s some positioning guidelines:
- They should be aligned horizontally
- They should be infront or at maximum, next to where the mic will be
- As much as possible, they should be in the middle of each quadrant
- Height should be above average people’s height
Speaker setup
Section titled “Speaker setup”Once the speaker is on, both of them should be setup with the following settings:
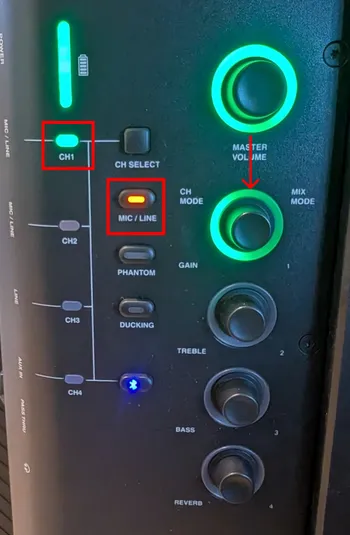
- Press ‘CH SELECT’ until only the light is only on CH1
- Make sure ‘MIC/LINE’ is on. Press to toggle
- Make sure ‘MASTER VOLUME’ (First knob) is maxed all the way
- Make sure ‘GAIN’ (Second knob) is half way (indicated by the arrow above)
Step-by-Step
Section titled “Step-by-Step”For both speakers:
-
Setup speaker tripod & Place the speaker on it
- You don’t have to extend the bottom of the tripod all the way, since it’ll take a lot of room and make it hard to position
-
Connect speaker cable to mixer
- Check label to know which XLR cable to use
- Check label to know which hole to plug to
- Plug to Input 1 of Speaker
-
Connect power cable to speaker
- Note: We haven’t been doing this, so check if possible on left
- On the right, we don’t have power extension yet
-
Power on speaker
- Hold power button for a few seconds
- It should light up
-
Check the volume
- Sometimes, the speaker makes a really low volume (when compared to the other one). If so, restart the speaker
- Left and right should output about the same volume
- Unless it’s panned from the mixer, but unlikely
-
Position screen to the right position
- Follow chart above